
PrintMaster Scans: scan-to-SMB setup
PrintMaster Scans is a standalone PowerShell utility provided by PrintMaster. It prepares a Windows PC to receive documents from a printer or copier using scan-to-SMB. It does not require a PrintMaster Agent or Server, and it does not configure the printer itself.
Prefer to configure Windows yourself? Follow the manual scan-to-SMB setup guide instead. That guide uses a dedicated account and scoped permissions without running the utility.
This is the receiving-PC side of Scanning & SMB. After setup, follow the copier-side checklist and check your brand hub for model-specific coverage.
Requirements
- Windows 11 is the primary support target. Windows 10 22H2 has best-effort compatibility; this does not extend Microsoft’s support.
- Windows PowerShell 5.1 or PowerShell 7, running as Administrator.
- Internet access to
scans.printmaster.workand GitHub for the loader and release download. - A printer with scan-to-SMB support and network access to the receiving PC.
Windows 7, 8, 8.1, and Windows Server are not validated support targets.
Prepare the PC
Open the Scans website and review the linked loader script before executing it.
Open Windows PowerShell or Terminal as Administrator and run:
irm https://scans.printmaster.work/scans.ps1 | iexReview the username, password, local directory, and SMB share name. The defaults are user
scans, directoryC:\scans, and sharescans. Keep the generated password or use one that meets your organization’s policy.Use the Settings gear to select which steps to run, then choose OK.
Review the progress list. On successful account setup, use Copy Password and store the credential securely before selecting Done. Do not share it in screenshots or issue reports.
The utility can create or update the dedicated local account, hide it from the login screen, create the folder, set folder permissions, create the SMB share, and add a desktop shortcut. It can also set non-domain network profiles to Private and enable File and Printer Sharing and Network Discovery firewall rules.
Review these changes before running on a managed PC. The utility grants folder permissions to the scan user, current administrator, and Everyone, and configures the share for the scan user. Use only on trusted networks with your administrator’s approval; it is not a least-privilege hardening tool. Existing scan-account passwords can be changed when rerunning setup, so update any printers using those credentials.
The windows carry the PrintMaster logo and “Provided by PrintMaster” attribution. The desktop shortcut retains the original scan-folder icon.
Setup walkthrough
These screenshots are rendered from the current app’s window definitions with example credentials and simulated progress/completion states. They illustrate the interface, not a real machine setup run.
Choose the destination
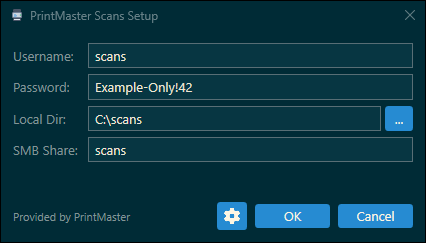
Review the username, generated password, local folder, and share name before proceeding. The screenshot is an example, not a credential to reuse.
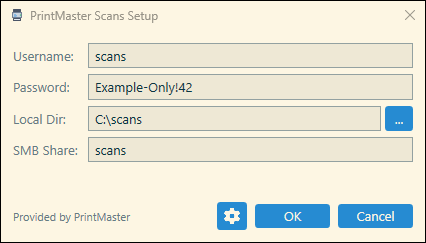
The app follows your Windows light or dark theme:
Select setup steps
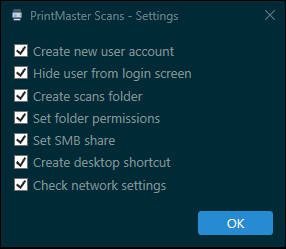
The gear opens the step selection dialog. Review which changes are appropriate for this PC before choosing OK.
Review progress
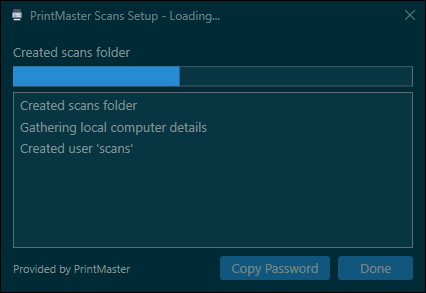
Wait for processing to finish and inspect the retained step details. A skipped step can be intentional, such as hiding an account on a domain-joined PC.
Save the credential and test
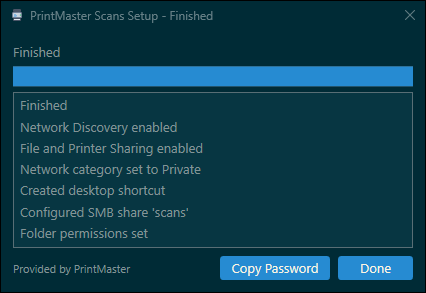
After successful account setup, copy and securely store the applied password, then configure and test the printer destination as described below. If the utility reports Completed with errors, follow the remediation rather than treating the destination as ready.
Configure the printer destination
After PC setup, open your printer’s address book or scan destination settings. Labels differ by vendor:
| Setting | Value |
|---|---|
| Protocol | SMB |
| Host / server | The receiving PC’s hostname or reachable IP address |
| Share / folder | The configured share name, scans by default |
| Username | The dedicated local scan user; if required, qualify it as PCNAME\scans |
| Password | The password successfully applied by the utility |
The default Windows UNC path is \\PCNAME\scans. If the printer has separate host and share fields, enter PCNAME and scans separately, not the full UNC path in both fields. Use the share name, not the local C:\scans path.
Send a test scan and confirm the document arrives in the folder. The receiving PC must remain powered on, awake, and reachable. On networks that filter SMB, have your administrator verify the intended printer-to-PC connection (normally TCP 445); do not expose SMB to the internet.
Releases and verification
The loader selects the promoted stable release from the site’s manifest, downloads its version-specific GitHub asset, and verifies SHA-256 before executing it. Download or verification failures stop setup; it does not fall back to development code.
To select a version, copy its pinned command from the release history. For example:
& ([scriptblock]::Create((irm https://scans.printmaster.work/scans.ps1))) -Version 'v2.1.0'
This still requires the online loader, manifest, and release asset. SHA-256 checks consistency with the manifest; it is not a digital signature or independent proof of publisher identity.
Troubleshooting
Windows rejects the password
InvalidPassword or net user error 2245 indicates that Windows rejected the password. Use the generated password or a longer password with uppercase and lowercase letters, numbers, and symbols, without the username. Generated passwords cannot guarantee compliance with every policy. Ask your administrator about the effective minimum length, complexity, history, and other restrictions rather than disabling policy.
When account setup fails, hiding the account, folder-permission setup, and SMB share setup are skipped. Copy Password remains disabled so an unapplied password is not presented as usable. Independent steps can still run.
Setup finishes with errors
Read the popup and retained progress details. Domain trust failures, access denied, and shares in use have specific remediation. Correct the reported issue and rerun with the appropriate steps selected. “Completed with errors” does not mean the destination is ready.
The printer cannot write a scan
- Confirm the PC is awake and reachable from the printer, and check the host and share fields.
- Confirm the configured account and password match a successful setup run.
- Check the share and folder permissions and the approved firewall/network profile with your administrator.
- Verify the printer supports your organization’s permitted SMB version and authentication settings. Do not enable obsolete SMB versions or disable security policies merely to make an old printer connect.
Downloads or checksum verification fail
Check access to the Scans site and GitHub. For a checksum mismatch, stop and report the error; do not bypass verification or run the unverified file.
Source and support
- Scans source repository
- Report a Scans problem (omit passwords and sensitive network details)
- Release and deployment guide