
Epson scan-to-SMB
Use this guide for the copier side of scan-to-folder setup. It does not require PrintMaster, Epson Scan 2, or an application running on the receiving PC. A working SMB share is still required.
Start with Scanning & SMB for the receiving-PC setup choices. The brand-neutral copier checklist explains the shared concepts; the Epson-specific field behavior is documented below.
Model and verification scope
| Item | Evidence |
|---|---|
| Device-reported model | ST-C8090 Series |
| Device-reported firmware | 03.97.OJ19PB |
| Interface | English Epson Web Config, administrator session |
| Inspection date | October 16, 2026 |
| Inspected directly | Administrator navigation, an empty contact’s SMB editor, field visibility, and scan-default settings |
| Not performed | Applying a contact, changing saved settings, testing the SMB connection, or sending a document |
The screenshots below are real captures of this device’s interface. Contact details are synthetic, entered into an empty slot without selecting Apply; the password is deliberately blank. The filename prefix in the defaults screenshot is also an unsaved example. Captures are cropped to the relevant interface, without the browser address bar, existing contacts, serial number, or network identifiers.
The control-panel sequence is documented in the ST-C8000/ST-C8090 User’s Guide, pages 187-189; it has not been physically exercised in this inspection. Do not assume these screens apply unchanged to other EcoTank, WorkForce, or WorkForce Pro models. The separately inspected WF-C878R has not yet been checked for this SMB workflow.
1. Prepare the receiving folder
Complete one of these alternatives before configuring the Epson:
- Manual Windows setup: a dedicated non-administrator account with scoped share and filesystem permissions.
- PrintMaster Scans utility: review the utility’s permission and networking changes before running it.
- An SMB destination already prepared by your storage administrator. The NAS/file-server guide is still planned.
Use your actual values, not the examples below:
| Required information | Example |
|---|---|
| Receiving PC or server | SCANPC |
| Published SMB share | scans |
| Full Windows network path | \\SCANPC\scans |
| Dedicated receiving-PC account | SCANPC\scans |
| Password | That account’s current password, obtained securely |
The Epson administrator password signs you into Web Config. The SMB account password lets the printer write to the receiving PC. They are different credentials; do not use a printer administrator or personal Windows administrator account for the share.
Confirm the PC stays awake and reachable and that the intended SMB connection, normally TCP 445, is permitted. Use the share test as the dedicated scan account before troubleshooting the printer.
2. Open Web Config as an administrator
- Find the printer’s current address from its network information or your approved inventory.
- Open its HTTPS address in a browser on the authorized network.
- Verify you reached the intended device and select Administrator Login.
- Enter your assigned administrator username and password and select OK.
- Confirm that administrator settings and Administrator Logout are available. A page merely loading successfully does not prove login succeeded.
This inspected device presented an untrusted HTTPS certificate. Have your administrator verify device identity and configure certificate trust. Do not disable certificate checking globally or enter credentials over HTTP as a workaround.
Select Scan/Copy, then Contacts in the left navigation.
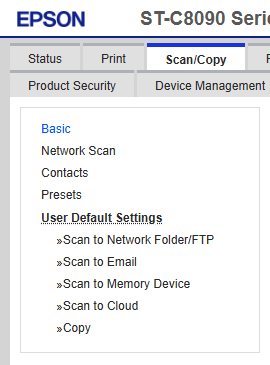
The Scan/Copy area separates destination contacts from presets and scan defaults. The capture shows the relevant navigation, not the printer’s existing address book.
3. Register a Network Folder (SMB) contact
- In Contacts, locate an empty numbered entry. On the inspected firmware, a new entry is opened with Edit, not an Add button.
- Select the empty entry’s radio button, then select Edit. Do not overwrite an existing contact just to test the procedure.
- Set Type to Network Folder (SMB). This changes the visible destination fields.
- Fill in the fields below.
| Web Config field | What to enter |
|---|---|
| Name | A recognizable destination name, for example Office scans |
| Index Word | A short search/sort word, for example scans |
| Type | Network Folder (SMB), not FTP |
| Assign to Frequent Use | ON if this should be a frequent destination; otherwise OFF |
| Save to | In the inspected form, enter SCANPC\scans. Web Config already displays the leading \\ immediately before the input. |
| User Name | The receiving host’s scan account, for example SCANPC\scans |
| Password | That receiving-host account’s current password |
Important: the leading backslashes are already supplied
The complete network path is \\SCANPC\scans, but the ST-C8090 form shown here renders \\ as a fixed prefix outside the Save to box. Enter only SCANPC\scans inside that box. For an existing subfolder, use SCANPC\scans\invoices.
Do not enter C:\scans, smb://SCANPC/scans, or an extra leading \\ into this particular input. If another Epson interface does not show a fixed prefix, follow that model’s instructions rather than stripping characters blindly.
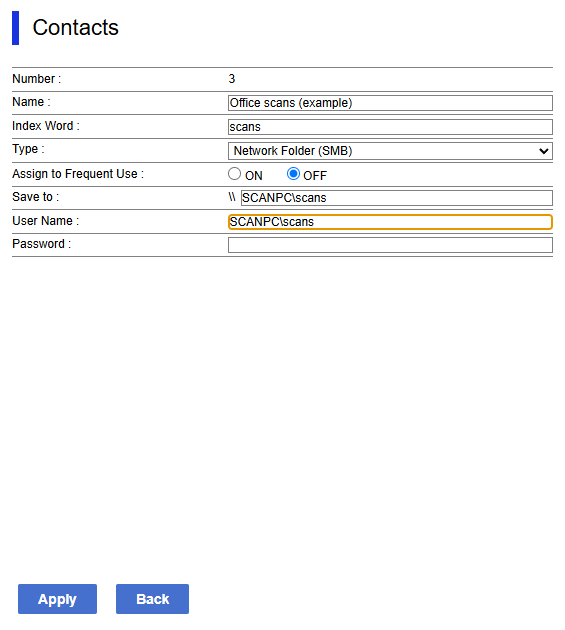
Unsaved example. The fixed \\ is outside the Save to input. The blank password is for publication only: enter the actual receiving-host credential when configuring your device. Nothing in this capture demonstrates a successful connection or delivered scan.
Connection Mode and Port Number are FTP controls in this editor; they were not visible after selecting SMB. Do not switch to FTP to make those fields appear. A separate domain box was not visible for SMB either: use the account format approved for the receiving host.
Apply and confirm the entry
When you are authorized to change the device:
- Review the destination and account information, then select Apply.
- Confirm the registration result and that the intended contact appears in the list. An error is not a saved configuration.
- If you are only inspecting the screen, use Back without selecting Apply.
Apply was not selected during this documentation pass. The ST-C8000/ST-C8090 manual describes this registration action, but persistence and SMB authentication remain untested on the inspected device.
4. Review scan defaults, if needed
Destination credentials belong to the contact. File format, image quality, and naming defaults are a separate screen:
Scan/Copy > User Default Settings > Scan to Network Folder/FTP
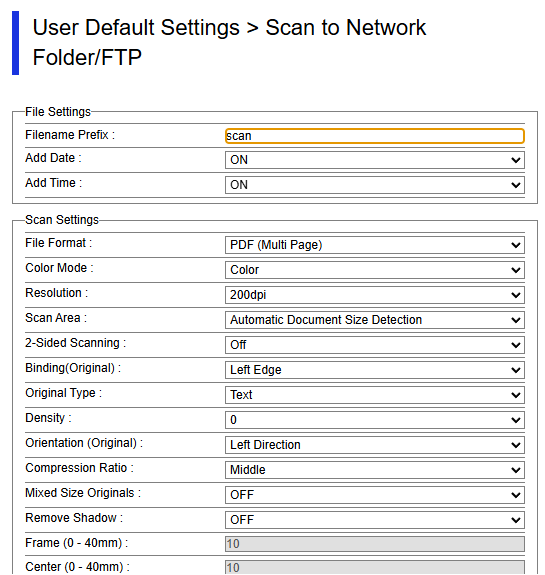
Real defaults screen, cropped to the file and upper scan settings. The prefix scan is an unsaved example. Selected values illustrate the inspected interface; they are not universal recommendations or proof that scans were delivered.
Useful controls observed on this firmware:
- Filename Prefix, Add Date, and Add Time control naming. Use a policy that avoids accidental collisions; do not assume the printer’s overwrite behavior.
- File Format includes JPEG, single/multi-page PDF, PDF/A, and TIFF. Choose a format your recipients can open.
- Resolution offers 200, 300, and 600 dpi. Higher resolution increases file size and transfer time.
- Scan Area, 2-Sided Scanning, and Binding(Original) should match the originals and feeder workflow.
- PDF Settings, farther down the page, has document-open and permissions-password controls. These protect a PDF; they are not SMB credentials.
Do not change shared defaults just to fix an address-book destination. Review who else uses the device. On this screen, OK applies settings and Restore Default Settings is not a navigation or troubleshooting shortcut; neither was selected during inspection.
5. Send a scan from the device and verify delivery
The following panel workflow is manual-documented, not hands-on tested in this pass:
- Place a non-sensitive original on the glass or in the ADF. Use the ADF for the supported multi-page/two-sided workflow.
- From the home screen, select Scan > Network Folder/FTP.
- On Destination, choose the registered folder contact. Check that you selected the expected contact rather than a similarly named entry.
- Review Scan Settings, including File Format, File Name, resolution, and the original’s sides.
- Start the scan using the device’s scan/start control.
- Check the job result, then confirm that a new file actually appears in the intended share/subfolder.
- Open the file as its intended recipient and check page count, orientation, and legibility.
A saved contact, connection test, or successful job indicator alone is not enough: verify the actual document arrives and opens. Record the result before treating this installation as ready.
Troubleshooting
| Symptom | Epson-specific check | Then check |
|---|---|---|
| Cannot find an Add button | Select an empty numbered contact, then Edit | Administrator login and any address-book restrictions |
| FTP settings appear instead of the expected folder fields | Confirm Type = Network Folder (SMB) | Do not configure FTP as an SMB workaround |
| Host or folder is not found | Inspect Save to, including the fixed prefix; use the share name, not a local drive path | Hostname resolution, stable address, existing share/subfolder, sleeping PC, routing and approved firewall rules |
| Authentication fails | User Name and Password must belong to the receiving host, not Web Config | Account format, password rotation, lockout, and approved SMB/authentication settings |
| Login works but writing fails | Confirm the correct contact and subfolder | Both SMB share permissions and filesystem permissions for the dedicated account |
| File arrives with unexpected format, name, or sides | Review Scan Settings and the separate network-folder defaults | Correct original placement, recipient software, filename policy, and storage capacity |
| Contact is saved but scans still fail | Record the exact device error/job result and time | Use scan-to-SMB troubleshooting and the exact model’s manual; do not guess error-code meanings |
Network Scan in the Scan/Copy navigation is not the same screen as the SMB address-book destination. Likewise, the device’s Network > MS Network page includes network-sharing/file-sharing controls; their presence alone does not establish that changing them is necessary for outbound folder scanning. Do not enable SMB1, guest access, or the printer’s own file-sharing features as a blanket fix.
Keep the device’s date/time correct, maintain an approved SMB/security configuration, and rotate the receiving-account credential according to policy. Update every affected contact when that password changes. Do not disable firewall or authentication protections to accommodate a failing device.
Sources and remaining verification
- Live, authorized read-only inspection of the ST-C8090 interface and empty contact editor on the model/firmware above. No saved settings were changed.
- ST-C8000/ST-C8090 User’s Guide, Web Config contact registration, pages 184-185.
- ST-C8000/ST-C8090 User’s Guide, network-folder scanning, pages 187-189.
- Official Epson ST-C8090 support and manuals. The page could not be retrieved by the inspection client; manual steps above were checked against the matching guide hosted by ManualsLib, not a different Epson model’s guide.
Before removing the delivery-test-pending label, save an authorized test contact, send a real document, verify recipient access, capture the panel/result, and record the outcome here. Add other Epson models only after inspecting their actual interface and recording differences.